
Trigger conditions ensure your flows will only trigger if a specific condition is met. For example, maybe you only want your flow to trigger if a field in Dataverse is equal to true. Maybe you only want your flow to trigger on changes that happen between 5PM and 7AM the next day so you can get a list of changes that happened overnight. Maybe you only want your flow to trigger if some field is greater than another field and some other field is equal to true and some other field is equal to false or null and some other field contains some string. The world is your oyster here.
There are some tricks I’ve learned to writing these things over the last few years. The language is slightly different than the expression language you’ll find when working with typical flow actions. You can use this as a guide to see how they work and build your own resource saving conditions moving forward.
Before We Begin, Let’s Talk About The Bad Way
You don’t have to use trigger conditions. You could do something like this:
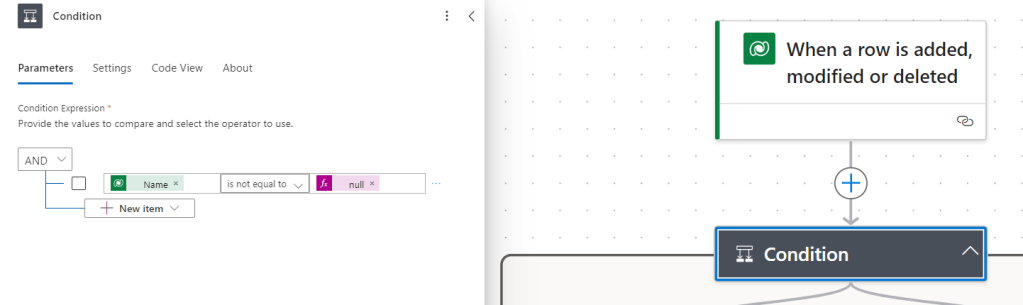
This flow would trigger and make sure to only move forward if the “Name” column contains data. Great, problem solved! People have been doing this forever as a way to gate their flows for specific conditions. However, this is resource intensive. The flow is still triggering for every single addition or modification in that table, when it doesn’t have to. Trigger conditions do just this; they add that condition to your trigger, so the flow never even kicks off unless that condition is met.
Prologue: A Cool Trick for Writing Trigger Conditions
There is one trick that will make writing trigger conditions for a data source SO much easier for you. To do this, add whatever trigger you’d like to your flow, I will be using “When an item is added, modified or deleted” for Dataverse. In this example, I want when an item is added to my table:


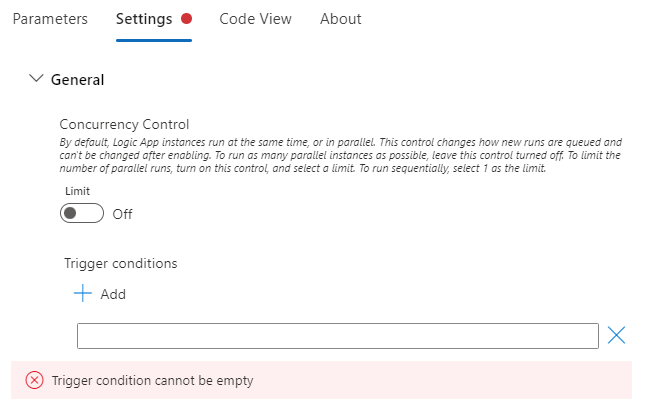
If you click on “Settings” you will see “+ Add” under the Trigger conditions section. If you click that button, a blank field shows up. If you’ve never written one of these things, they can be a little tricky and you don’t get a lot of information on this screen:
In MS Learn, you’ll find good documentation on what trigger conditions are and how to write them with some basic examples. But there is a magical trick that will save you a lot of hassle. Under your trigger, add a “Filter array” action. In the Filter Query section, select a field from your trigger that you want to base your trigger condition on and what that condition is. In this case, I want where the table “Name” column is equal to “First item”:

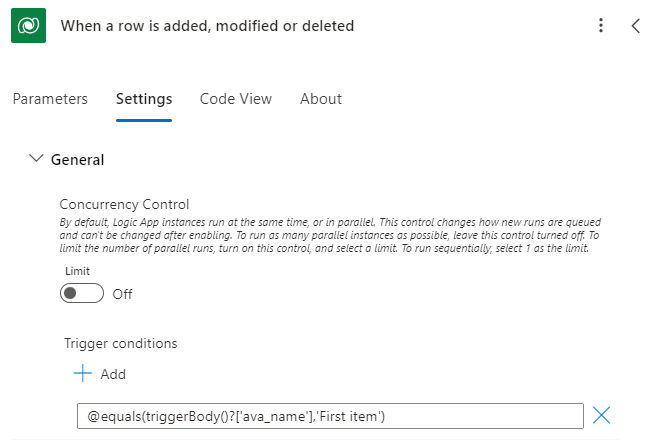
Under that box, click “Edit in advanced mode”. Here you will see a line of text that you can use for your trigger condition:

Copy it to your clipboard and remove any @symbols and curly brackets you see, like so:

That’s your trigger condition! You can add it back into your trigger condition section in the trigger “Settings” and now your flow will only trigger when someone creates an item with the Name “First item”.
To test this trigger condition, create two items in your table. Set the “Name” value to “First item” in one row, and another to a different name. Your flow should only trigger once. This magical filter array trick that I love so much can be used on any data source. Add a “Filter array” action beneath your trigger, set up the logic, copy the advanced filter array and enjoy.
Part 1: Singular Trigger Conditions
Trigger when a field is not empty
This would only trigger if that “Name” field is not empty:
@not(equals(triggerBody()?['ava_name'], null))
Trigger when a field contains a string
This would only trigger if the table “Name” column contains “Hello”. Maybe you would convert that field to something else after the fact with a business rule:
@contains(triggerBody()?['ava_name'],'Hello')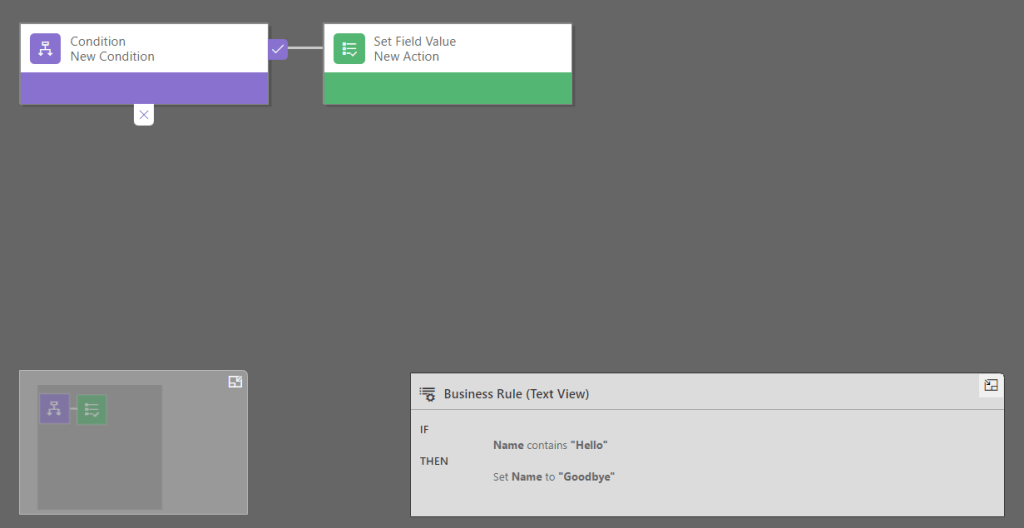
Trigger when a choice field in Dataverse contains a value
Dataverse choice columns are returned as two separate fields, the value and the label:

The label is the column we want for comparison. So, the format generally follows this pattern:
_(publisher prefix)_(lowercase logical column name)_labelIn our case, the call would look like this to trigger off a single choice column field in the Trigger Conditions table:
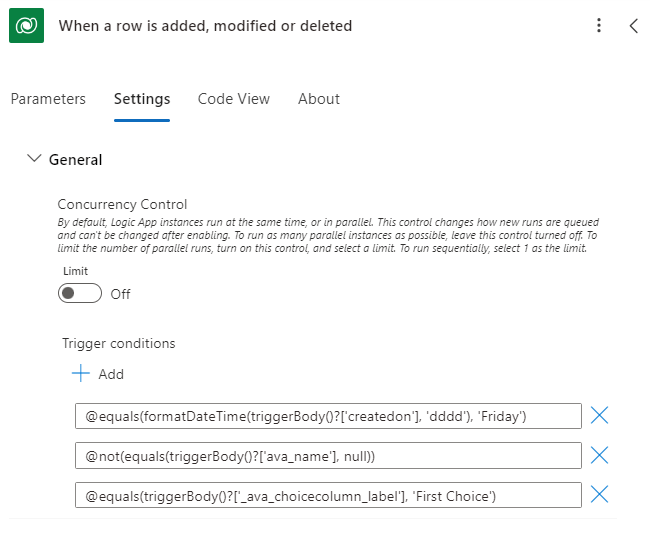
@equals(triggerBody()?['_ava_choicecolumn_label'], 'First Choice')Only trigger if it’s Friday
Have you ever wanted to automate shutting people down when they message you on a Friday? We all dream of it. You can handle it like so:
@equals(formatDateTime(triggerBody()?['createdon'], 'dddd'), 'Friday')I like this example because it shows that you can make trigger conditions your own. You can format the data. You can call things that are completely unrelated to the trigger as we’ll see in the next section. These are set up to handle a variety of scenarios to fit your business needs.
Part 2: Multiple Trigger Conditions in the Old Designer
In the old flow designer, you had to do some intense looking code to make multiple trigger conditions work on the same flow. The basic structure looked like this:
@and({condition 1},{condition 2})

@and({condition 1},and({condition 2},{condition 3}))

@and({condition 1},and({condition 2}, and({condition 3}, and({condition 4}, {condition 5}))))

@and({condition 1 here},or({first or condition},{second or condition}))
You can chain together as many of these as you want. The last and or or statement just needs a comma to separate them. This way was tricky because you have to be very good at parenthesis management (never thought I’d write parenthesis management in my career but here we are). Here’s a cool example of the old system using multiple conditions and an if statement.
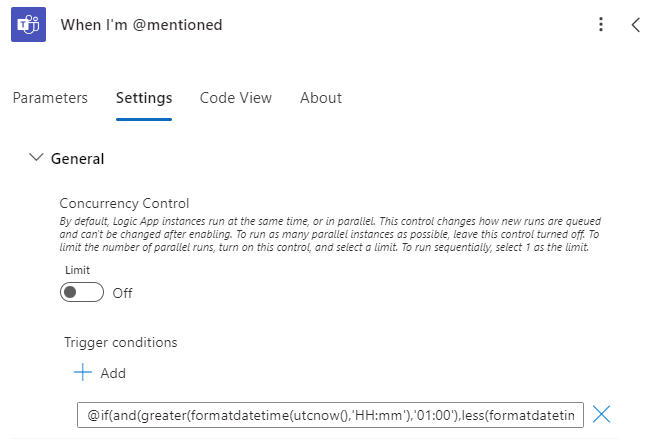
Only trigger between a certain timeframe
This trigger will be in UTC time, so you need to convert it to your time zone. I went to Bing and asked “What’s 5PM PST in UTC time?”, which is 01:00 UTC, and “What’s 7AM PST in UTC time?”, which is 15:00 UTC. Our trigger condition will look like this:
@if(and(greater(formatdatetime(utcnow(),'HH:mm'),'01:00'),less(formatdatetime(utcnow(),'HH:mm'),'15:00')),true, false)You can use this trigger condition for any trigger that accepts trigger conditions. Maybe you only want this for messages you’re mentioned in a channel on Teams in that window:
Part 3: Multiple Trigger Conditions in the New Designer
In the new designer, this process is a lot simpler for and statements, but you will still need to know the previous way for handling or statements. In the new designer, you can chain together multiple and statements by adding them directly in “Settings”:
If you want to add one or many or statements, you can do so by using the code for an or statement in the section above and adding it to these rows.
Conclusion
Trigger conditions help improve your efficiency on the platform. Instead of triggering your flows on all new items, then adding a condition to handle if it’s really an item you care about, a trigger condition can handle it for you so your flow only triggers when necessary. This saves resources and improves intentionality. Being intentional is good in both life and software development.
My name is Ava. I hope this article was useful to you if you find it floating around. Feel free to leave questions in the comments or find me on LinkedIn if you have article ideas for Power Automate and Power Apps. And happy Friday 🙂

Leave a reply to Arlene Licudine Cancel reply