
Purpose: This guide walks you through the process of configuring Single Sign-On (SSO) in Microsoft Copilot Studio using Microsoft Entra ID (formerly Azure AD). It explains not just the steps, but also the reasoning behind each step, common pitfalls, and troubleshooting methods.
1. Understanding SSO in Copilot Studio
Single Sign-On (SSO) allows users to log in once with their organizational Microsoft account and gain access to Copilot without re-entering credentials.
Why IT Admins Care About SSO:
• Security: Authentication is centralized under Microsoft Entra ID policies (MFA, conditional access, password policies).
• User Experience: No extra login prompts.
• Governance: All authentication is logged centrally for auditing and compliance.
2. Prerequisites
Before starting, confirm you have the following:
✅ Microsoft 365 admin account with permissions to create and configure Azure App Registrations
✅ Access to Azure Portal (portal.azure.com)
✅ Access to Copilot Studio (make sure the environment is provisioned)
✅ Your Tenant ID (Azure Portal → Microsoft Entra ID → Overview)
✅ A local test environment (VS Code + Local Web Server extension)
✅ GitHub access to download the Microsoft SSO sample page
Tip: Keep your Tenant ID, Client IDs, and URLs handy — you’ll reuse them in multiple steps.
3. Overview of the Setup Process
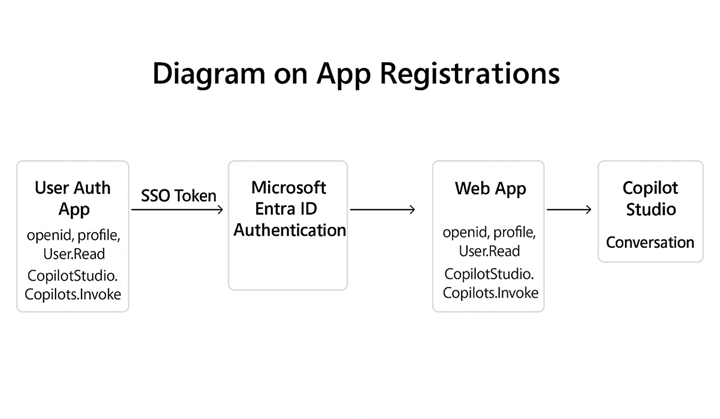
• Create two app registrations in Azure AD: User Auth App (for Copilot Studio authentication) and Web App (for local testing).
• Configure authentication settings in Copilot Studio.
• Set up a Federated Credential to establish trust between Copilot Studio and Entra ID.
• Download and configure Microsoft’s SSO sample web page.
• Test and troubleshoot the setup.
4. Step-by-Step Setup
Step 1: Create the User Auth App
Purpose: This app allows Copilot Studio to authenticate users through Entra ID.
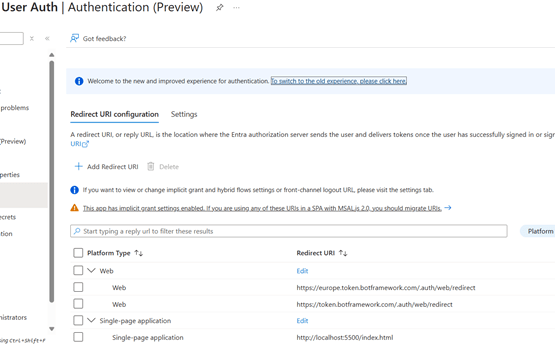
1. Register the app: Azure Portal → App registrations → New registration. Name: “User Auth”. Supported account types: Single tenant. Redirect URI (Web): https://token.botframework.com/.auth/web/redirect. Click Register.
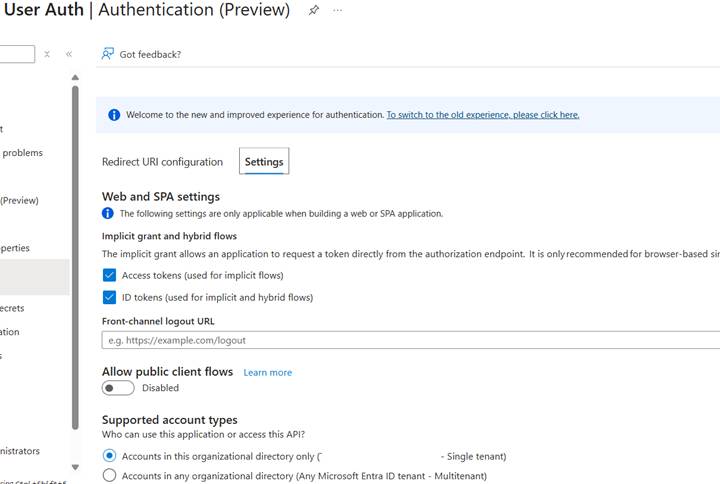
2. Configure Authentication: Under Authentication, add http://localhost:5500/index.html. Enable ID tokens and Access tokens.
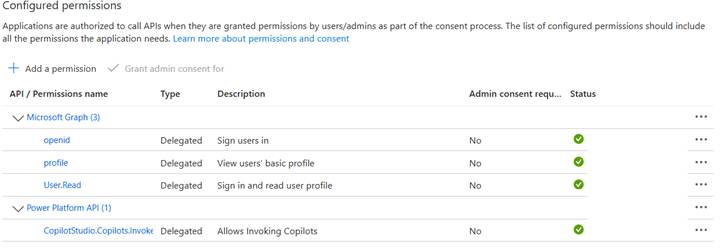
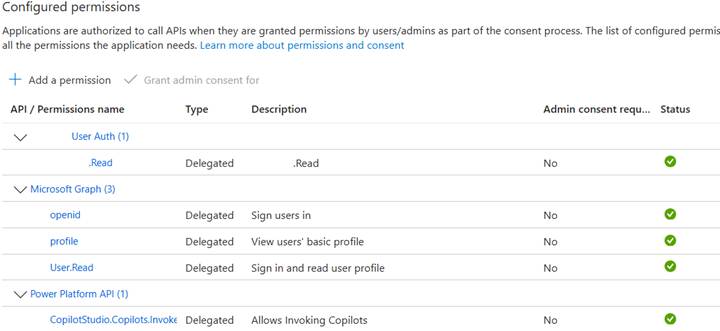
3. Add API Permissions: Microsoft Graph → Delegated → openid, profile, User.Read; Power Platform API → Delegated → CopilotStudio.Copilots.Invoke. Click Grant admin consent.
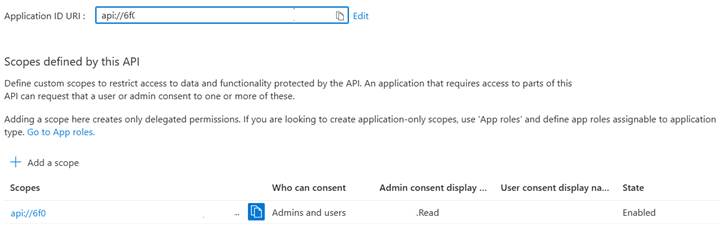
4. Expose an API: Set Application ID URI: api://<UserAuthAppID>. Add Scope: Name: Demo.Read, Who can consent: Admins & Users. Save.
Step 2: Create the Web App
Purpose: This app is used to host and run the local SSO test page.
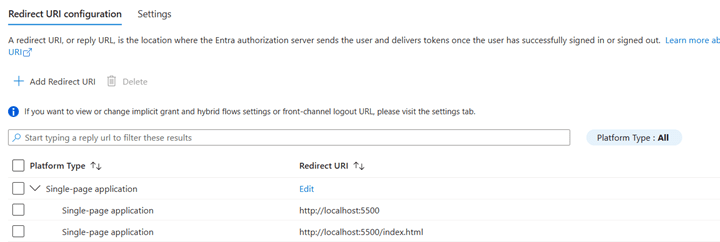
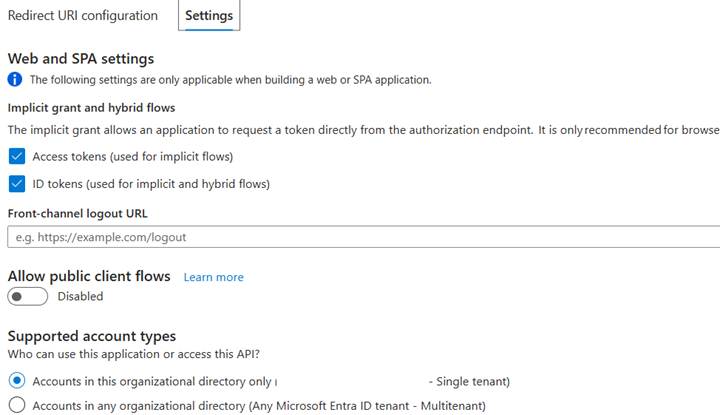
1. Register the Web App: Name: “Demo Chat Registration Local Dev”. Platform: Single-page application. Redirect URIs: http://localhost:5500 and http://localhost:5500/index.html. Enable ID tokens and Access tokens.
NOTE: Redirect URLs can also be configured under Authentication settings.
2. Add API Permissions: Microsoft Graph → Delegated → openid, profile, User.Read; Demo User Auth → Delegated → Demo.Read; Power Platform API → Delegated → CopilotStudio.Invoke. Grant admin consent.
3. Authorize the Web App: In User Auth App → Expose an API → Authorized client applications. Add Web App Client ID and grant Demo.Read.

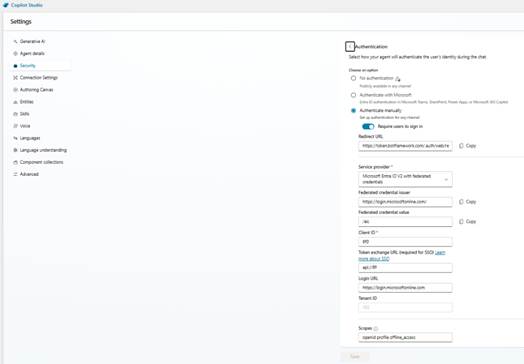
Step 3: Configure Copilot Studio
In Copilot Studio → Settings → Security → Authentication:
• Select Authenticate manually.
• Fill in Redirect URL: https://token.botframework.com/.auth/web/redirect
• Service Provider: Microsoft Entra ID V2 with federated credentials
• Client ID: <UserAuthAppID>
• Token exchange URL: api://<UserAuthAppID>/Demo.Read
• Login URL: https://login.microsoftonline.com/<tenantid>/oauth2/v2.0/authorize
• Scopes: openid profile offline_access
Click Save and copy the Federated Credential Issuer and Value.
Step 4: Add Federated Credential
In User Auth App → Certificates & secrets → Federated credentials → Add credential.
• Scenario: Other issuer
• Issuer: Paste from Copilot Studio
• Value: Paste from Copilot Studio
• Audience: api://AzureADTokenExchange
Save.

Step 5: Download and Configure GitHub PoC
Download from https://github.com/microsoft/CopilotStudioSamples/tree/main/SSOSamples/SSOwithEntraID
Open index.html in VS Code and update:
const clientId = “<Web App Client ID>”;
const tenantId = “<Your Tenant ID>”;
const tokenEndpoint = “<Direct Line token endpoint from Copilot Studio>”;
NOTE: Use the Email Channel Token Endpoint for this value.
const loginRequest = { scopes: [“openid”, “profile”] };
Step 6: Run and Test
Run a local server and open http://localhost:5500/index.html. Click Log in → The agent should greet you without showing a login card.
5. Troubleshooting
• Login card still appears? Check that the Token Exchange URL in Copilot Studio matches the OAuth scope, ensure Federated Credential Issuer/Value are correct, and re-publish the agent.
• MSAL redirect URI errors? Confirm http://localhost:5500 is in the Web App’s redirect URIs.
• Popups blocked? Allow popups for login.microsoftonline.com.
6. Summary
By completing this guide, you have:
✔ Registered two Azure AD apps (User Auth + Web App).
✔ Configured Copilot Studio Manual Authentication.
✔ Set up a Federated Credential.
✔ Implemented a local SSO test environment.
✔ Verified SSO functionality.
You can now embed this SSO-enabled agent into production applications, extend security policies via Microsoft Entra ID Conditional Access, and monitor authentication logs for auditing.

Leave a comment