A Beginner’s Guide
Introduction
Welcome to the exciting world of Application Lifecycle Management (ALM) for Power Platform in Azure DevOps! This guide has been crafted to be your go-to resource for setting up ALM seamlessly. ALM is not just a buzzword; it’s the key to efficiently managing Power Platform solutions, fostering collaboration, and maintaining version control. Let’s embark on this journey together and empower your projects with ALM prowess. This is one way of establishing an ALM process in Power Platform by community best practices for early ALM adopters.
Prerequisites: Before starting the setup, ensure the following prerequisites:
- Permissions:
- You must have Sys Admin privileges on the Power Platform environments.
- Access:
- You need access to Azure DevOps with the necessary permissions to create projects, pipelines, and release stages.
- Extensions:
- Ensure that Power Platform Build Tools extensions are loaded/installed in Azure DevOps.
- Resource:
- Solution hosted in a Power Platform Developer environment that will be part of the ALM process.
Step 1: Project Initialization
1.1. Create a New Project:
- Create a new project in Azure DevOps with a Private Type. A Private Type project ensures restricted access for sensitive projects.
1.2. Create a Repository:
- Initialize a repository within the project.
- Initialize a README file for initial documentation.
1.3. Configure Repository Security:
- Go to Project Settings.
- Navigate to Repositories.
- Click on the repository and access the Security tab.
- Grant “Project Name” Build Service Contribute permissions.
- Additionally, grant Project Collection Build Service Contribute permissions.
Step 2: Validate Power Platform Build Tools
2.1. Check Installed Extensions:
- Verify that the Power Platform Build Tools extensions are installed.
- If not installed, go back to the organization settings and browse the marketplace for the extension. Install it if required.
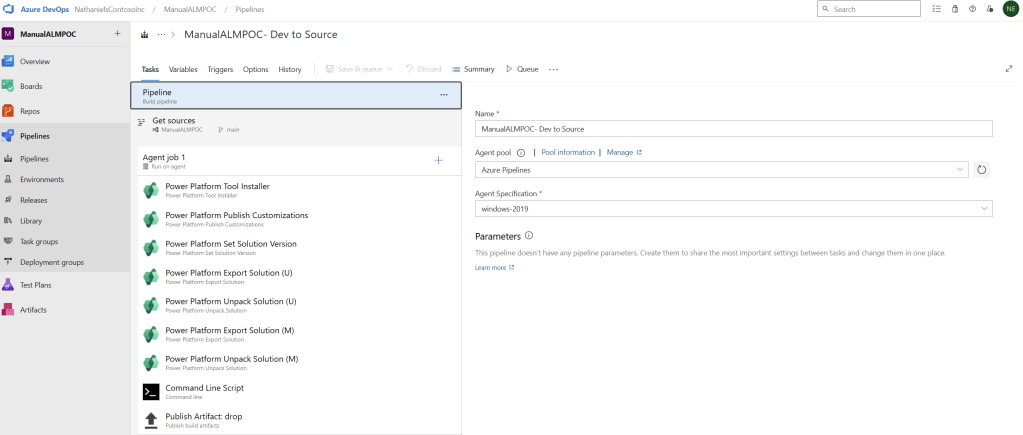
Step 3: Create a Pipeline
3.1. Create a Pipeline:
- Create a new build pipeline using the Classic Editor.
3.2. Validate Project and Repository Entries:
- Ensure that project and repository information is accurately configured within the pipeline.
- Confirm Team project, Repository and default branch values.
3.3. Configure Pipeline:
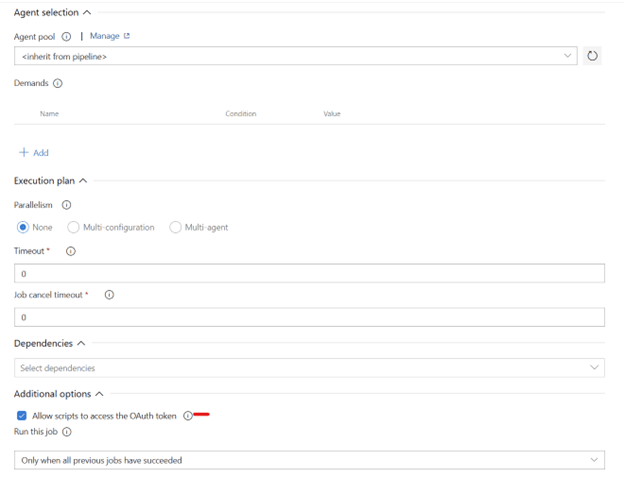
- Select an Empty Job.
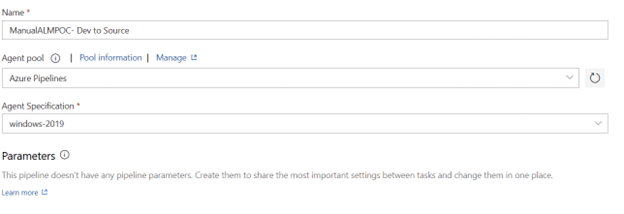
- Validate the Agent Specification to be Windows 2019 and the Agent Pool to be Azure Pipelines.
3.4. Check Agent Settings:
- Ensure that the agent is checked and configured to Allow Scripts to access the OAuth Token under Additional Options.
3.5. Name the Pipeline:
- Provide a descriptive name, such as “Dev to Source.”
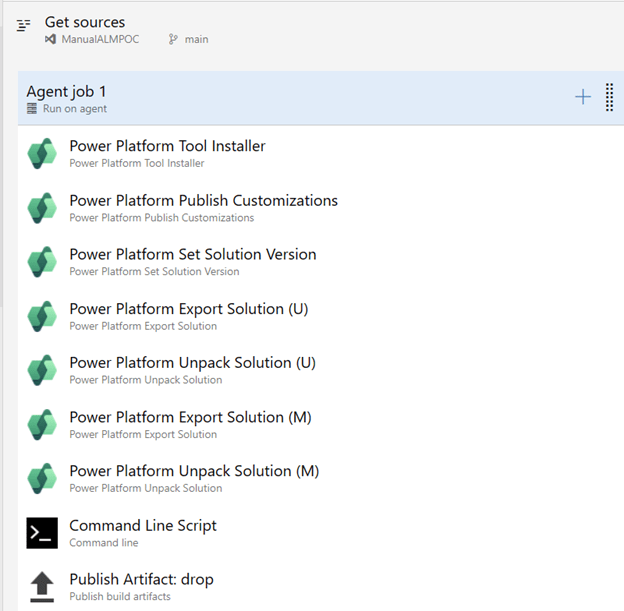
Step 4: Agent Steps
4.1. Add Steps to Agent:
- Load/Configure the following agent steps:
- Power Platform Tools Installer.
- Power Platform Publish Customization.
- Power Platform Set Solution Version.
- Power Platform Export Solution.
- Power Platform Unpack Solution.
- Power Platform Export Solution (Again).
- Power Platform Unpack Solution (Again).
- Command Line Script
- Publish Artifact: drop
Step 5: Power Platform Publish Customizations
5.1. Authentication and Service Connections:
- Configure authentication using Username and Password.
- Create service connections, providing the username, password, and HTTP address of the Power Platform environments.
- Service Connections need to be configure for each environment that is part of the ALM process (Developer, Sandbox, Production)
- Select the Service Connection named “Dev Environment.”
- Note: Ensure that this service connection specifically corresponds to your developer environment.
5.2. Set Solution Version:
- Select the Dev Service Connection.
- Copy the logical name of the solution.
- Create a pipeline variable named “SolutionName” and add the copied name to the variable.
- Add the variable to the step “$(SolutionName)”.
- Specify the Solution Version Number as “1.0.0$(Build.BuildNumber)”.
Step 6: Export and Unpack Solutions
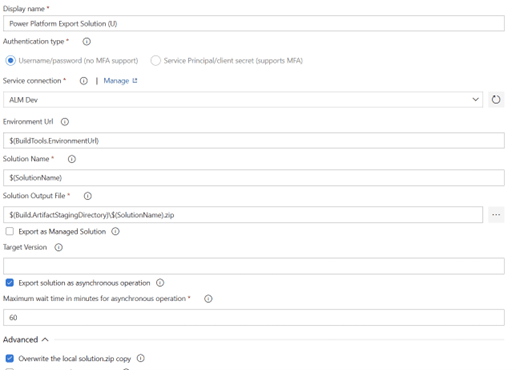
6.1. Power Platform Export Solution (U):
- Rename and add “(U)” to the title.
- Select the Dev Service Connection.
- Enter the following information.
- Solution Name: $(SolutionName)
- Solution Output File: $(Build.ArtifactStagingDirectory)$(SolutionName).zip
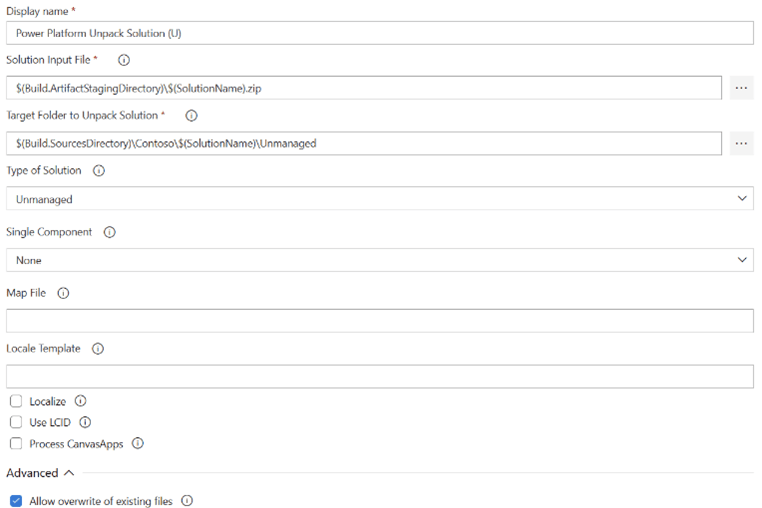
6.2. Power Platform Unpack Solution (U):
- Rename and add “(U)” to the title.
- Enter the following information:
- Solution Input File: $(Build.ArtifactStagingDirectory)$(SolutionName).zip
- Target Folder to Unpack Solution: $(Build.SourcesDirectory)\Contoso\$(SolutionName)\Unmanaged
6.3. Power Platform Export Solution (Again):
- Rename and add “(M)” to the title.
- Select the Dev Service Connection.
- Enter the following information:
- Solution Name: $(SolutionName)
- Solution Output File: $(Build.ArtifactStagingDirectory)$(SolutionName)_managed.zip
- Check “Export as Managed Solution”

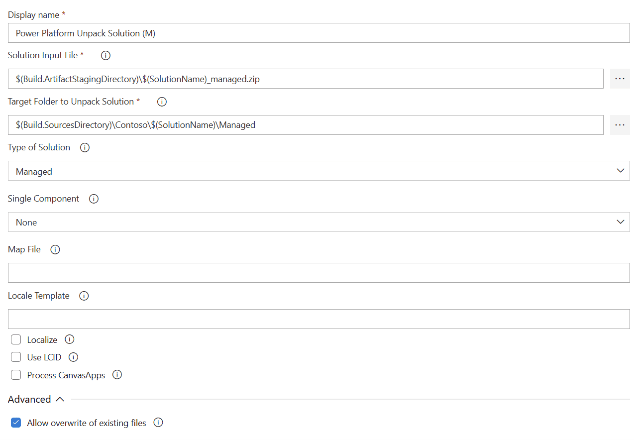
6.4. Power Platform Unpack Solution (Again):
- Rename and add “(M)” to the title.
- Enter the following information:
- Solution Input File: $(Build.ArtifactStagingDirectory)$(SolutionName)_managed.zip
- Target Folder to Unpack Solution: $(Build.SourcesDirectory)\Contoso\$(SolutionName)\Managed
- Type of Solution: Managed
Step 7: Additional Steps
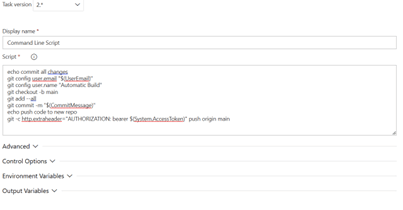
7.1. Add Steps to Agent:
- Include a Command Line Script step for Git-related actions.
- Configure the script to perform Git commits and pushes. Example script provided below:
echo commit all changes
git config user.email “$(UserEmail)”
git config user.name “Automatic Build”
git checkout -b main
git add –all
git commit -m “$(CommitMessage)”
echo push code to new repo
git -c http.extraheader=”AUTHORIZATION: bearer $(System.AccessToken)” push origin main
7.2. Global Variables:
- Define global variables
- UserEmail
- CommitMessage; check the settable at queue time box.
7.3. Artifact Publishing:
- Add a Publish Artifact step with the alias “drop.”
Step 8: Run the Pipeline
8.1. Run the Pipeline:
- Execute the build pipeline to trigger the defined tasks and steps, including Git actions and artifact publishing.
Step 9: Create a Release Pipeline
9.1. Create a Release Pipeline:
- Click on Releases and select “New Pipeline.”
9.2. Configure Release Pipeline:
- Create an Empty Job with a Stage Name, e.g., “Test.”
9.3. Artifact Configuration:
- Add an artifact source, selecting the previous build pipeline as the source.
- Set the Default Version to “Latest” and specify the Source alias as “BuildABC.”
9.4. Select Tasks:
- Add steps to the agent, including Power Platform Solution Tools and Power Platform Import Solution.
- Power Platform Import Solution
- Select Authentication Type
- Configure authentication using Username and Password.
- Create service connections, providing the username, password, and HTTP address of the Power Platform environments.
- Select the Service Connection named “Test Environment” if you haven’t created already from previous steps.
- Environment Url: $(BuildTools.EnvironmentUrl)
- Solution Input File: $(System.DefaultWorkingDirectory)/BuildALMPOC/drop/$(SolutionName)_managed.zip
- You can find the address by browsing the repository under the solution input file

9.5. Agent Job Configuration:
- Check “Allow scripts to access the OAuth token.”
9.6. Global Variables (Release):
- Define the SolutionName variable as “LogicalName of the Solution.”
9.7. Power Platform Import Solution:
- Save and clone the stage.
- Rename the copied stage from “Copy of Test” to “Prod.”
- Change the Service Connection from “Test” to “Prod.”
- Change the Service Connection to the Prod environment.
Appendix:
- $Build.ArtifactStagingDirectory:
- Relevant Steps: 6.2 and 6.3 in the guide.
- Purpose: Represents the directory where build artifacts are copied during the build process, ensuring a standardized and accessible location for further processing.
- $Build.SourcesDirectory:
- Relevant Steps: 6.2 and 6.3 in the guide.
- Purpose: Represents the directory where source code files are downloaded during the build process, maintaining an organized structure for solutions.
- Purpose of Step 7:
- Relevant Steps: Step 7 in the guide.
- Purpose: Automate version control operations using Git, ensuring changes are tracked, documented, and pushed to a designated repository for collaboration and version history.
- Purpose of Step 7.3:
- Relevant Steps: Step 7.3 in the guide.
- Purpose: Focuses on Artifact Publishing, creating a shareable and persistent artifact (labeled as “drop”) for easy retrieval and deployment in subsequent stages or pipelines.
- Purpose of Environment Url: $BuildTools.EnvironmentUrl – Step 9.4:
- Relevant Steps: Step 9.4 in the guide.
- Purpose: Represents the URL of the Power Platform environment, dynamically specifying the environment URL during the release process for flexibility and scalability.
- Additional ALM References Documentation
- Application lifecycle management (ALM) basics with Microsoft Power Platform – Power Platform | Microsoft Learn
- ALM environment strategy considerations – Power Platform | Microsoft Learn
- Implement ALM for a new project with Microsoft Power Platform – Power Platform | Microsoft Learn
- ALM for developers – Power Platform | Microsoft Learn
- Microsoft Power Platform Build Tools for Azure DevOps – Power Platform | Microsoft Learn
Now armed with this comprehensive guide and understanding, go ahead and conquer ALM for Power Platform in Azure DevOps! Happy developing!

Leave a comment