
The error codes you receive from HTTP requests mean different things. If you’ve done some development around REST API calls, you’ve probably received the following errors at some point:
- 400 – The server can’t process your request because you typed it poorly, shame on you.
- 401 – You’re not authenticated to make this request. The server has no idea who you are.
- 403 – The server is well aware of who you are and knows you don’t have access to what you’re trying to access.
- 404 – Your syntax is fine and the server knows who you are, it just has no idea what you’re talking about.
This list keeps going all the way through 431. There’s plenty you can do to mess up this process, but every once in a while, you’ll have a workflow that’s working just fine and get a dreaded error code:
429 – You’ve made too many requests to the server.
Companies who expose their data via REST API calls use something called rate limiting to ensure that their service isn’t bogged down by users sending too many requests in a specific period of time. You can run into this error from a number of data sources (SharePoint, Dataverse, SQL Server, Snowflake, etc.) but it always means the same thing; you’re throwing too much at us, please chill out. Each service has their own API rate limiting, including Dataverse. If you are hitting your rate limit with Dataverse via the out-of-the-box connector in Power Automate, it probably means you’ve sent too many add/update/delete operations inside something like an Apply to each loop without giving the server enough time.
But I really need to update all that data every day. Is this my life now? Waiting for the server to be okay with how much I throw at it?
Me guessing what you’re probably thinking.
No, you don’t have to wait. We have a few options on the platform for handling bulk data for Dataverse. You can perform bound actions on a number of rows in a single table. You can also use a plugin for creating and updating multiple Dataverse records. This would be something you can build on the platform and requires less setup, but what’s happening under the hood is the exact same as a batch or bulk HTTP call. And HTTP calls would be how you perform this operation on any number of data sources. Here’s how you make batch calls for SharePoint Lists. Learning best practices around HTTP calls will benefit you in a number of ways if you plan on working with data at scale. We’re going to get into the weeds here, so if you are already comfortable with HTTP calls and just want to learn how to do it for Dataverse you can scroll down to the third section.
Part 1: Dataverse API App Registration
Most Rest API service providers want you to authenticate yourself to their platform so they know they can trust that you have access to the data you are trying to access. For internal Microsoft tools like Dataverse CRM and Graph API, you will be handling this via app registration in Microsoft Entra ID (the artist formally known as Azure Active Directory). Often times this requires an administrator to help setup, so just give them a really nifty business case and send them this article.
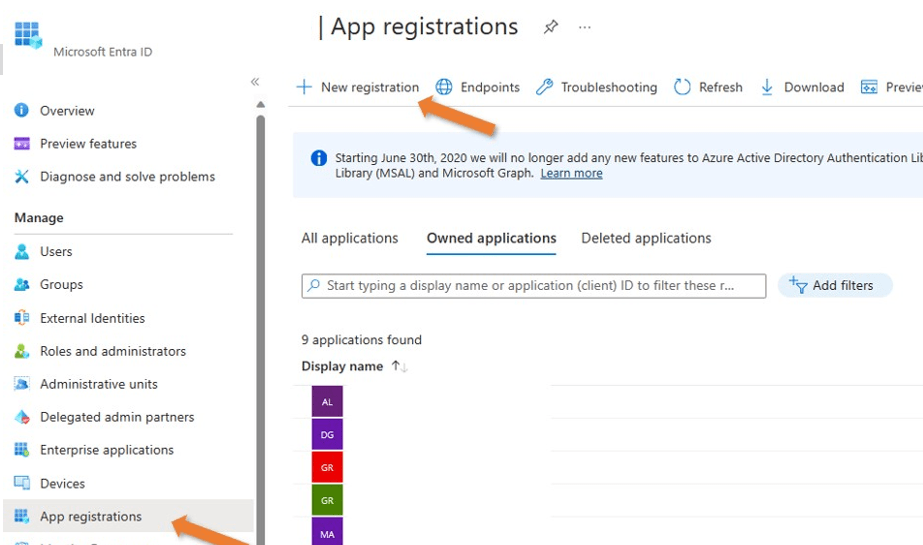
Step 1: Visit Microsoft Entra ID. Click on App registrations on the left pane and select + New registration at the top of the screen.
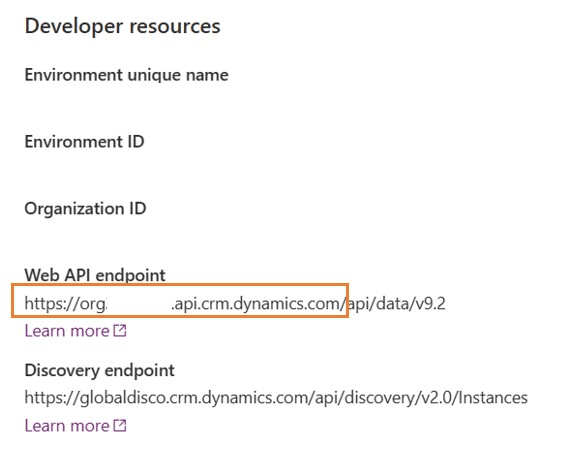
Step 2: In another tab, visit the Power Apps site for your tenant and navigate to the environment you are trying to access data from. Click on the cog in the upper right corner of the screen and select Developer resources. In the pane that opens on the right side of your screen, you will see the Web API endpoint for that environment. Copy the URL through .com and paste it somewhere like Notepad as any good developer would do for safekeeping.

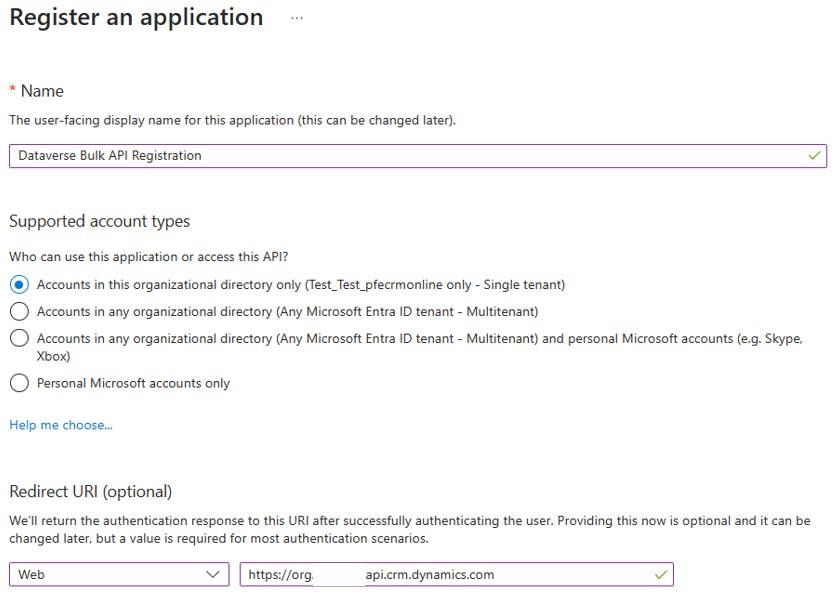
In your app registration tab, give your registration a good name saying what it’s for, select your supported account types and paste in that Web API endpoint URL under Redirect URI -> Web.
Step 3: In the left pane, select API permissions and click + Add a permission. In the pane that opens on the right side of the screen, you want to select Dynamics CRM and select the user_impersonation option under permissions.

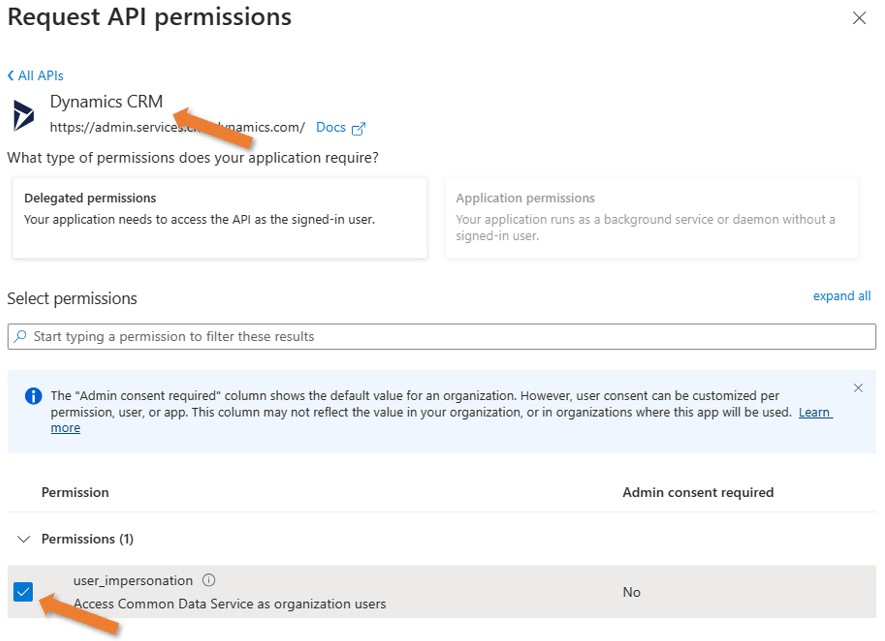
Your permissions should look like this:

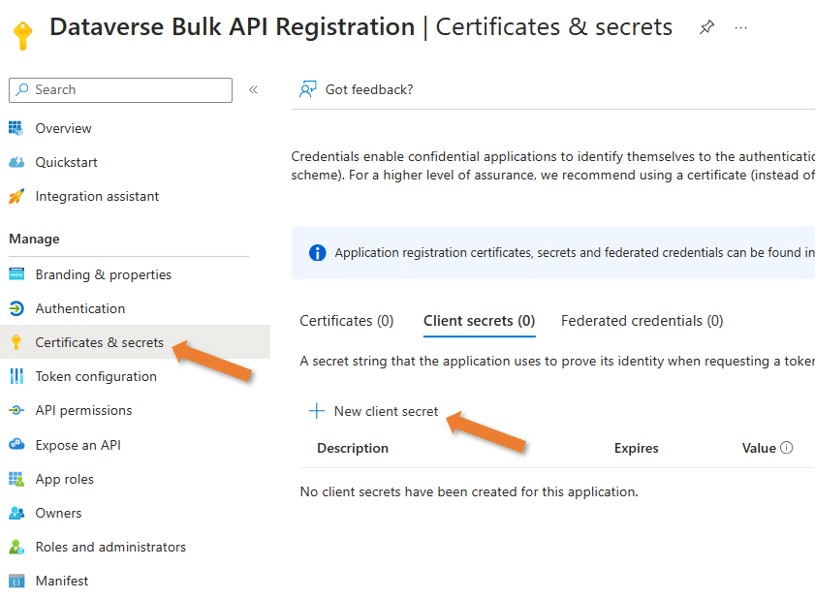
Step 4: Click on Certificates & secrets in the left pane. Select + New client secret under the client secrets tab. Give your secret a super cool name and when it should expire. After creating, copy the value of the secret (not the Secret ID). Paste that on your Notepad from earlier.

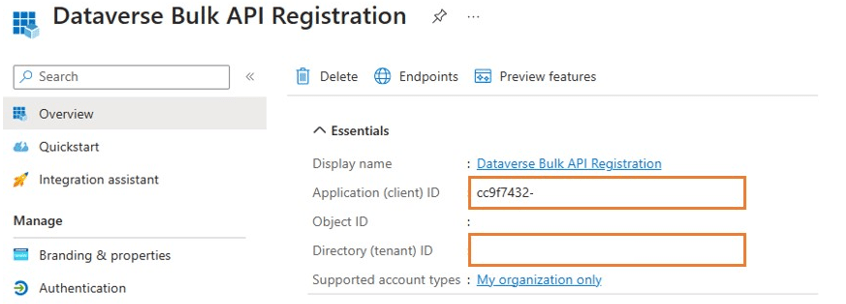
Step 5: Click on Overview in the left pane. Copy the Application (client) ID and the Directory (tenant) ID and paste them on… you guessed it, your Notepad!
Our work in Entra ID is done.
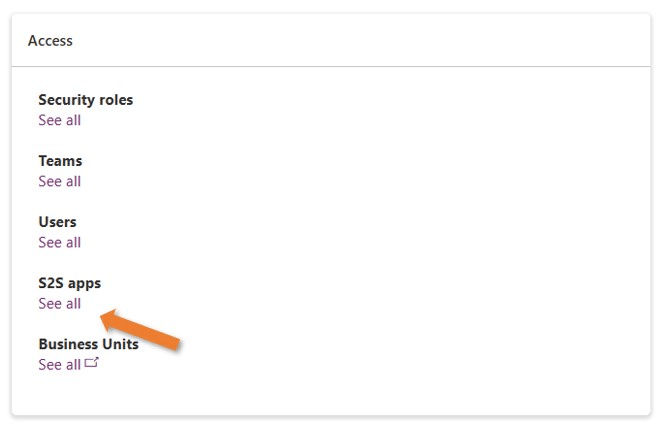
Step 6: We need to add our new app registration to our environment. In the Power Platform Admin Center, click on the Environments tab in the left pane and click the environment you’d like to access Dataverse in. On the right side of the screen under Access, you should see a button for S2S apps. These are server-to-server authenticated apps that communicate between your web apps and Dataverse.
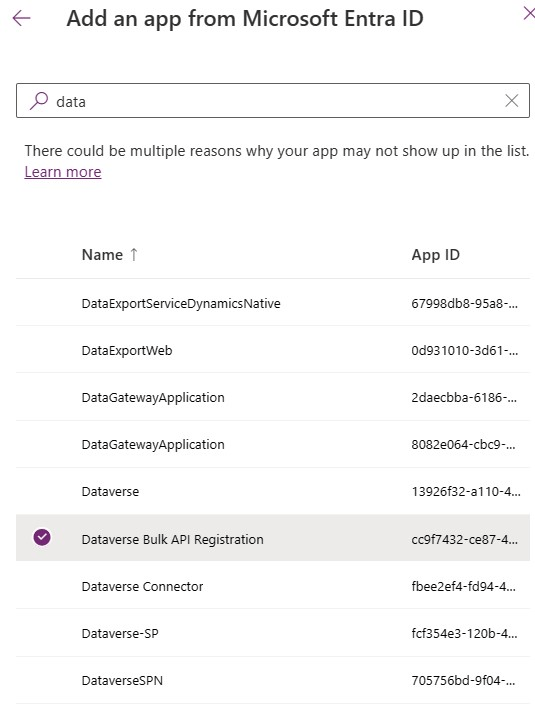
At the top of the screen, select + New app user. In the pane that opens on the right side of the screen, select + Add an app and search for the app you just registered in Entra ID. The App ID should match the Application (client) ID you have on your Notepad. Select a business unit and the System Administrator role, or any role with correct permissions to that data, for that app. Click Create and your app now has access to Dataverse in that environment!

Part 2: Generate Your Trust Token
Now we can actually build a flow, super exciting. Almost every REST API call requires the use of a bearer token or some form of authentication to the service in order to access the data. Sometimes this authentication comes in the form of OAuth 2.0. It can come in the form of an API key. It may even just be a username and password. You can access both Graph and Dataverse CRM API’s using bearer tokens, which can be created via an HTTP call. We make an HTTP call to use HTTP calls, how poetic.
Step 1: The rest of this is pretty theoretical. This Power Automate flow can do whatever you want it to do. Remember that this will make your flow premium, so plan licensing accordingly. I’m just going to focus on the important part of getting access to your Dataverse database.
In your flow, you’ll want to store that application (client) ID, client secret, tenant ID, and organization URL you should still have saved on your Notepad. You can hide these in your flow via Compose, or you can just make them into variables. Remember, until you share your flow (or your organization adds a service account to it) you are the only one that will have access to it. Store your credentials safely and make sure you only share with people who should have access. In my case I used variables, so anytime you see the variable name that’s what you can imagine there.
The first HTTP call we want to add is to generate our token:
Method: POST
URI: https://login.microsoft.com/{tenant ID}/oauth2/token
Header: Content-Type = application/x-www-form-urlencoded
Body:
grant_type=client_credentials&
client_id={application client ID)&
client_secret={client secret}&
resource={organization URL}

You can test your flow now. If your flow doesn’t fail, we can rejoice and move onto the next step. If it fails, check your error message. You should see one of the ones listed at the beginning of this article and make the changes accordingly.
Step 2: That HTTP POST call will return an access token for us. We can parse that token as an expression using a Compose action:
outputs(‘HTTP’).body.access_token
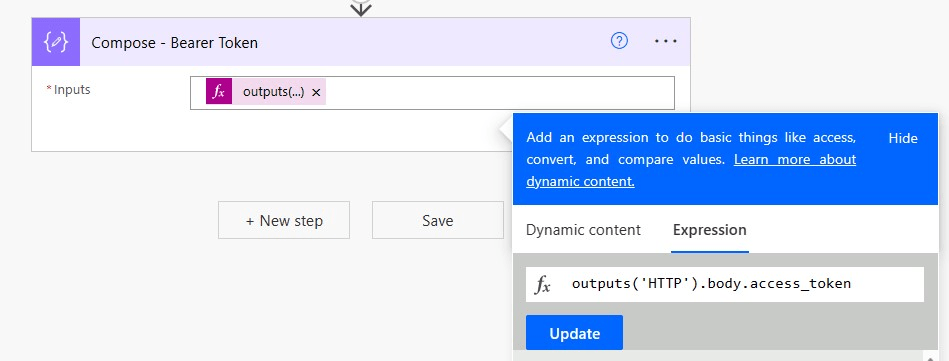
When you run your flow, if you see a long string of text in that Compose action you are good to move onto the fun part.

Part 3: Using Dataverse’s “UpdateMultiple” API Call
We should have everything we need to access Dataverse data via a REST API call. This unlocks a ton of possibilities. Fun fact, every action in Power Automate is a REST API call. Every time you create an item in SharePoint, that’s Power Automate putting a pretty face on your REST API call to SharePoint. It’s the same with most other connectors. Here’s documentation for the API calls you can make to Dataverse.
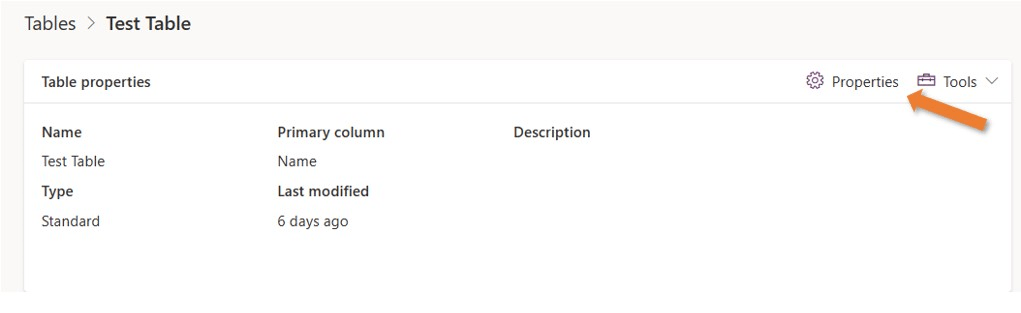
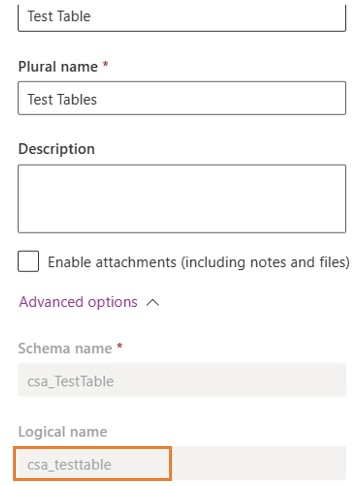
Step 1: Since we’re already making an HTTP call for the bulk update, we might as well get the items we want to update using an HTTP call. We can make a basic call to get rows in a Dataverse table, even though the List rows action would do the same thing. First, we need the logical name of the table you want to update. To get this, find your table in Dataverse and click on Properties. In the pane that opens up, you can copy the logical name of your table:
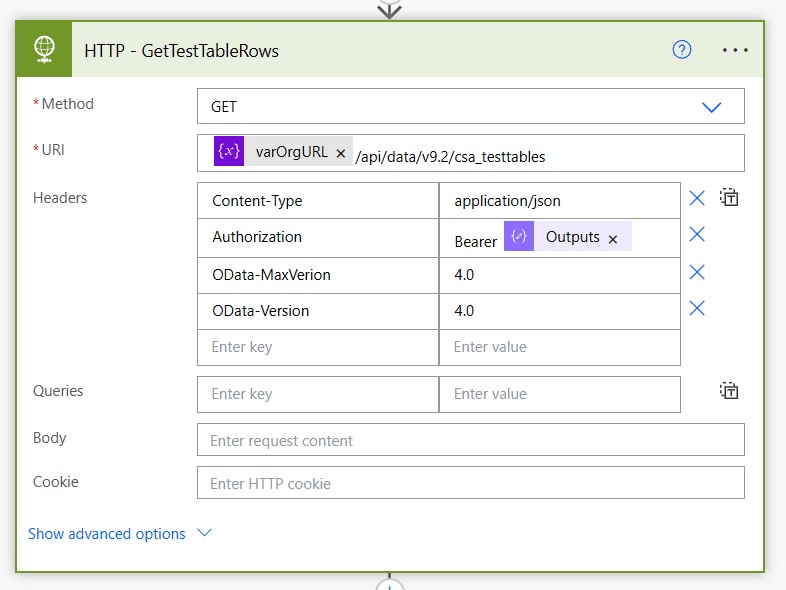
The HTTP call to get data from that table would look like this:
Method: GETURI: {organization URL}/api/data/v9.2/{logical table name}Headers: Content-Type = application/json Authorization = Bearer {outputs of your bearer token Compose action} OData-MaxVersion = 4.0 OData-Version = 4.0
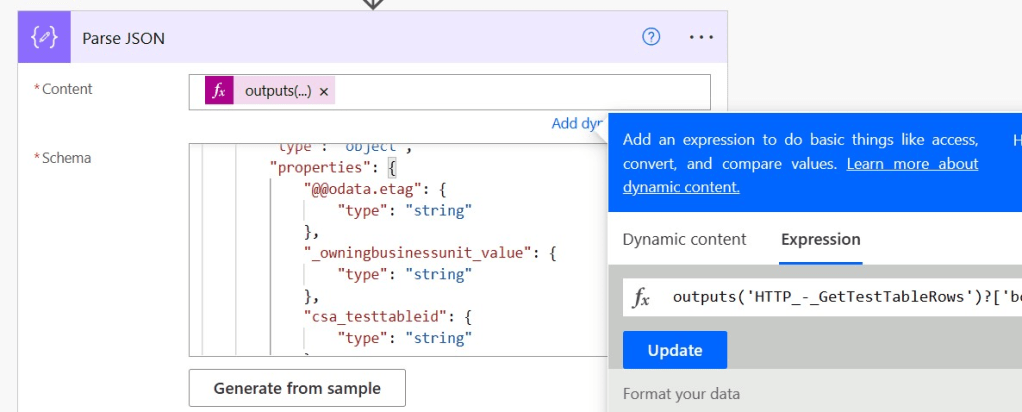
Step 2: You can use a Parse JSON action to get data from the response of that HTTP call. If you named your HTTP action what I did above, it would look like this as an expression:
outputs('HTTP_-_GetTestTableRows')?['body/value']
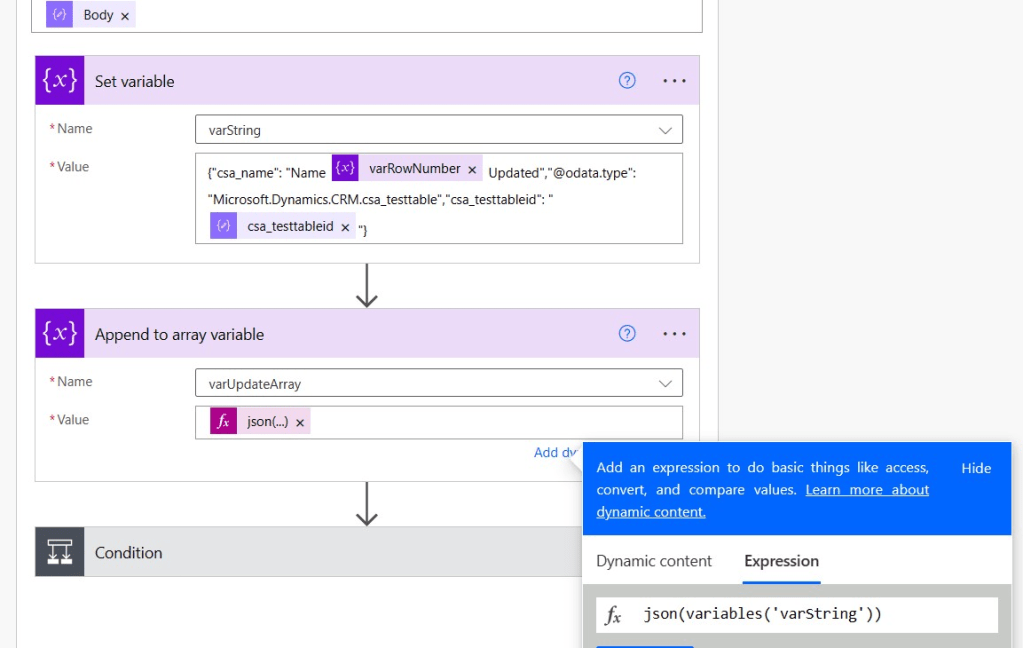
Step 3: I looped through every line of that data and added the columns I wanted to objects in an array. You need the logical name of your columns, which can be found in the column properties in Dataverse. In my case, the Name column was actually csa_name. The important part is making sure you grab the primary key of that table (usually the name of the table itself in Dataverse) when updating rows in that table so the update call knows which rows to update. In my case, that was the csa_testtableid column. I added these to the array inside an Apply to each loop that when through the responses from that GET HTTP call we made earlier. One of these objects in the array may look like this:
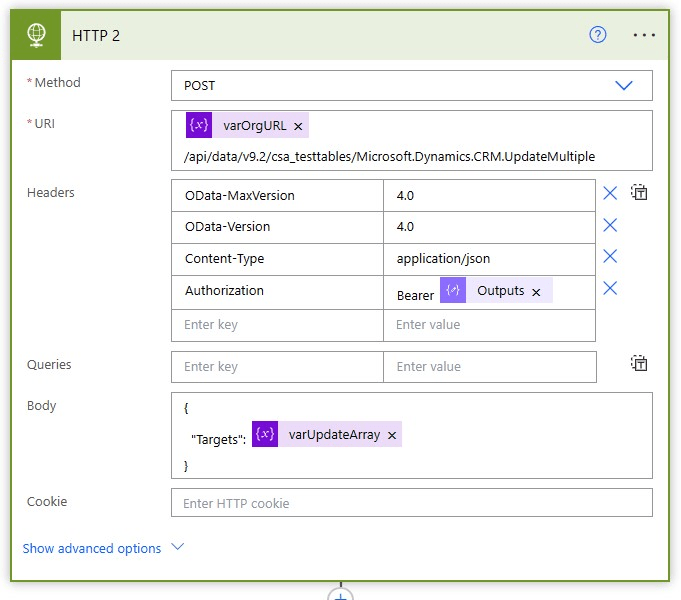
Step 4: The rest is up to you. Whatever you need to do to fill that array and however many calls you need to make to Dataverse are entirely up to your business case. When do you have your array of objects ready to go, here’s the HTTP call we’d make to do the batching:
Method: POST
URI: {organization URL}/api/data/v9.2/{logical table name}/Microsoft.Dynamics.CRM.UpdateMultiple
Headers:
OData-MaxVersion = 4.0
OData-Version = 4.0
Content-Type = application/json
Authorization = Bearer {outputs of your bearer token Compose action}
Body:
{
"Targets": {your array of objects}
}
And that’s it. If you’ve captured your primary keys as parts of that object and your syntax is correct, this will update those records in Dataverse hundreds at once instead of you updating them one by one. Throttling is tied to the number of items being added, so keep in mind the Dataverse rate limit moving forward and plan accordingly. You can utilize the Delay action if you are pinging the server too close to the rate limit for any data source.
My name is Ava. I SO hope this article was useful to you if you find it floating around. Feel free to leave questions in the comments or find me on LinkedIn if you have article ideas for Power Automate and Power Apps.
Thank you for reading.
Have a nice day.

Leave a comment